The Belly Button Start for Circular Knitting Projects
Bonjour, France! "[Tuto] Démarrer un ouvrage circulaire" (http://www.midian.ch/forum/)
Recently, members of a European forum have been coming to see my circular start, and I wanted to say "hello and welcome!". I wish I were bilingual, because I could greet my French visitors properly!
I am thrilled to announce that I finally have a French translation for this circular start. Please scroll down until you see it.
Welcome Ravelry visitors! I am RosemarieB on Ravelry. Thank you so much for dropping in and checking out the Belly Button start. You are most welcome to peruse my blog and check out my knitting, including last year's big project, the PhoenixPalme. Stay a while, enjoy, and send feedback if you choose to use my start. I'm always looking for ways to make it better! Thanks so much.
___________________________________________________________
Je vous présent le petit nombril en SEPT langues, anglais, russe, finnois, italien, et allemand ! En déroulant ce page vous les trouverez tous !
Bonjour la France !
Bienvenue aux amis de Ravelry où je m’appel RosemarieB. Je suis ravi de vous accueillir ici chez moi, home de le « bellybutton start ». Je vous invite à découvrir mon blog, mes tricots, et surtout mon grand projet de l’année dernière, le PhoenixPalme.
Faites comme chez vous, et surtout si jamais vous essayez mon début de tricot en ronde n’hésitez pas à m’envoyer votre feedback. Je suis toujours à la recherche des améliorations - vos conseils me seront d’un aide précieuse (surtout en ce qui concerne cette traduction fait par un américain très bien intentionnée mais bon, pas toujours au top niveau en ce qui concerne le français…)
Bien cordialement,
Rosemarie___________________________________________________________
The Belly Button Start for Circular Projects
This method trumps almost any other circular cast-on I've ever seen. I've tried many, including the insane multiple-needle/toothpick method, using pillows and pins and whatever else you can think of.
The belly button cast-on for circular projects makes starting any circular knitting project a real joy.
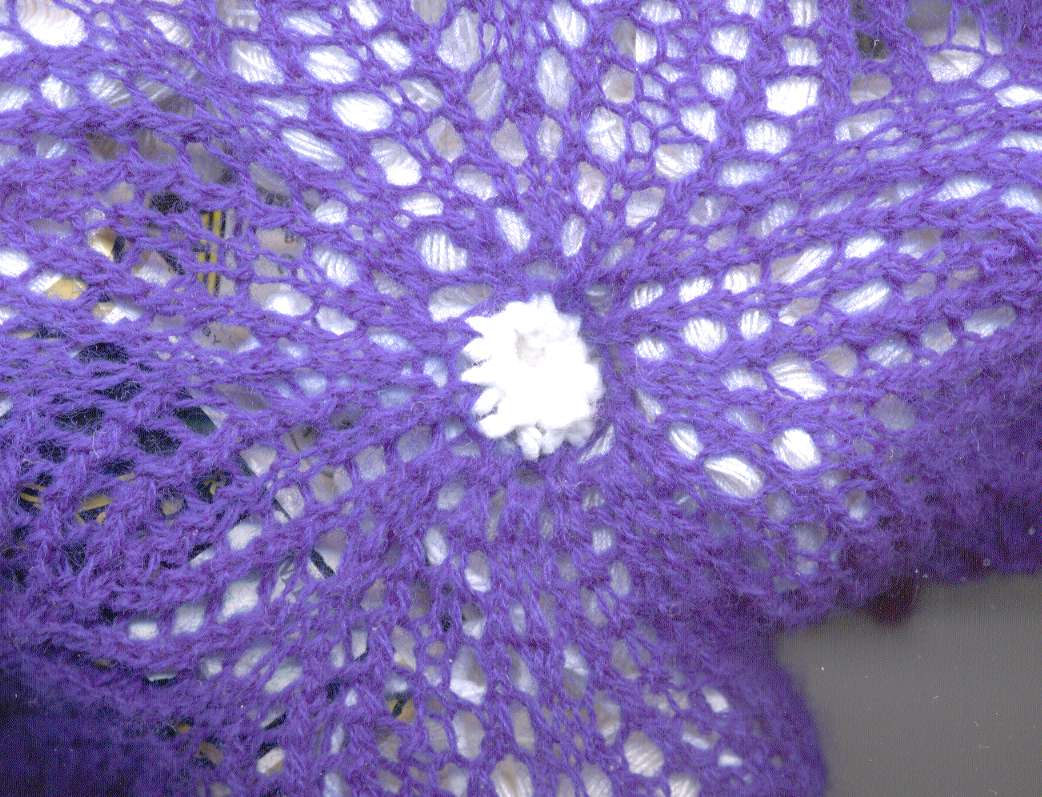
Pictured here is the belly button for Niebling's Lyra, which I knit in 2005. I used heavy "crafter's" cotton for the belly-button, and a very fine laceweight, cobalt-blue, 100% wool for the Lyra itself.
And here are the directions!
Rosemarie's Belly Button Start for Circular Knitting Projects
1. Start out with two of the dp needles you'll be using to knit your chosen pattern. (You can switch to your circular needles at the usual time, when your project is big enough.)
2. Using (I prefer cotton) a Size 5 or thicker thread (heavier, contrasting colour acrylic yarn works, too), cast onto ONE needle, the number of stitches called for in your circular pattern. The contrasting thread/yarn colour is important, as this will help you when it comes time to remove the belly button.
For example: If your circ. pattern calls for 12 stitches divided between four needles, then simply cast 12 stitches onto one dp needle.
I will be using the "12 stitches" as my example, but adapt the beginning stitch numbers to whatever your patterns says.
3. Now ... simply knit back and forth until you have a piece about an inch long. Tension is important, please, knit tightly! You need this piece to be very firm, as this will make supporting the multiple needles much easier!
4. Then: divide those 12 stitches onto the four double pointed needles (or whatever the pattern calls for).
5. Knit two or three times around, using the same heavy cotton thread (or acrylic yarn). Essentially, you are now knitting a glorified "I-cord". Be sure to pull the thread tightly between needles, to avoid "ladders".
This is an important step for beginning the actual pattern. If you don't pull the heavy thread tightly, you will have gaps in the belly-button that will likely translate into gaps in your pattern knitting. The "belly-button" you're knitting should be very firm, if you're using large enough heavy thread and have lots of tension.
6. Drop the heavy thread. Now, using the thread you have chosen for your project, knit one or two times around, (do not start knitting your pattern yet!),keeping the tension firm, knitting the project thread right into the last round of the heavy thread.. Be sure you leave a "tail" on your project thread long enough to thread through a needle with an eye (I usually leave about 60 cm or 2 feet).
7. Now start knitting your pattern.
Finishing the centre:
You may choose to do Steps 8 - 12 at any time.
8. Thread your project thread through a sharp-pointed sewing needle. Very carefully thread it through the first round of stitches of the PROJECT THREAD, the ones which are knitted into the last round of the heavy thread.
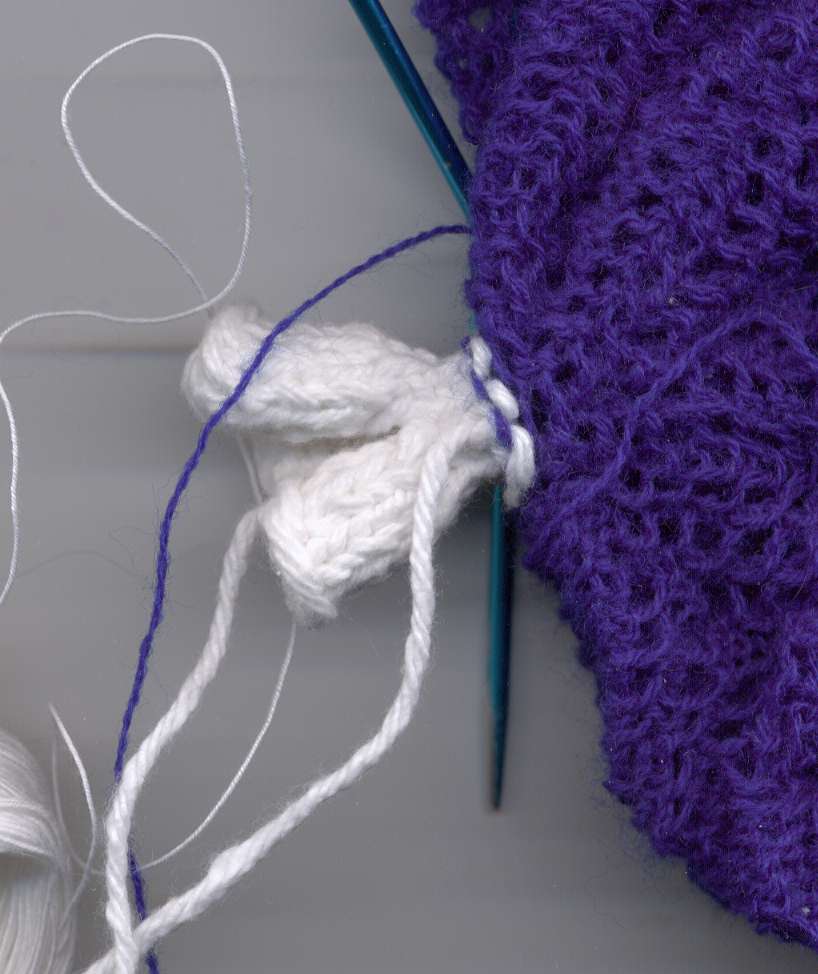
9. Pull the tail thread slowly and carefully, making sure you have picked up all 12 stitches on that first round of the project thread. I use a lighted magnifying lamp, although a good light and reading glasses will work, too. You may pull the tail thread tightly, or leave it in a more open "o" style, whatever suits you.
(This is the belly button on my Lyra, one of Herbert Niebling's legendary patterns.)
10. Take the tail thread one more time through all 12 stitches, and then fasten or tie it off in whatever style you usually use.
11. With a pair of very sharp, very small scissors, cut off the belly-button (being the heavy thread), being very careful to not cut any of the thread of your project.
12. You can throw away the belly-button, or put it in your portfolio, with date and time of delivery (kidding
_______________________________________________________________
Bonjour!
Le nombril du tricot en ronde
Ce méthode dépasse de loin tous les autres que j’ai pu expérimenter. Et je peux vous dire que j’ai essayé de tonnes, y compris le truc kir dents/nombreuses aiguilles avec des coussins et des oreillers et tout le reste…
Le nombril fait en sort que vos projets en ronde se démarre en beauté :
Voici le nombril pour Niebling’s Lyra, que j’ai tricoté en 2005. J’ai utilisé du « heavy “crafter’s” cotton » pour le nombril et une laine à tricoter dentelle très fin 100 % coton en bleu cobalte pour le Lyra.
Et voici les instructions…à vos aiguilles !
Rosemarie’s Nombril pour le tricot en ronde
TOUT D’ABORD VOUS DEVEZ
-
Choisir le projet tricoté en ronde que vous souhaitez réaliser
-
Vérifier la taille des aiguilles nécessaires ainsi que la quantité de laine requis pour le projet
-
Procurer les aiguilles de deux points (vendus habituellement en jeu de cinq) et des aiguilles circulaires nécessaires pour l’aboutissement de votre projet en commençant avec la plus petite circulaire de 40 cm allant jusqu’à le taille requise pour finir votre projet
-
Choisir la laine pour votre projet ainsi que du coton ou autre fil contrasté pour le nombril qu’on appellera le « fil du nombril » (il est très important que ceci soit d’un couleur et/ou texture autre que le fil de votre projet final - je vous conseil un fil assez épaisse du type _______________________)
-
Pour commencer, prendre deux des aiguilles de deux points de la taille recommandé pour votre projet (normalement il y a cinq dans le paquet – ne vous inquiétez pas les autres seront utilisés plus tard). Commencez avec deux aiguilles deux points.
-
Avec le « fil du nombril » et votre méthode de montage préféré montez sur une seule aiguille à deux points le nombre de mailles indiqué dans le patron circulaire que vous avez choisi, (Et je ne peux qu’insister encore une fois, pour ce début il est très important de choisir un couleur/texture qui contraste avec le couleur de votre projet final car le moment venu d’enlever le nombril et de libérer votre projet il est très important de pouvoir distinguer entre les fils….)
Par exemple, si votre patron demande 12 mailles divisées entre 4 aiguilles, alors vous montez 12 mailles sur une seule aiguille à deux points.
Bien évidement, 12 mailles n’est qu’un exemple – le patron que vous avez choisi demandera peut être 8 ou 10 mailles et dans ce cas vous montez 8 ou 10 selon les instructions mais toujours sur une seule aiguille à deux points.
-
Maintenant….c’est facile, tricotez, à l’endroit de rangé en rangé sur deux aiguilles jusqu’à ce que ça mesure 2.54 centimètres plat. Il est important que ce petit début soit assez ferme, d’où l’intérêt de choisir un fil plus épais. Je vous conseil de tricotez bien serré, comme ça, une fois que vous introduisez les quatre aiguilles pour votre tricot en ronde tout sera beaucoup plus facile !
-
Ensuite répartissez ce 12 mailles entres les quatres aiguilles à deux points (ou les 8 ou 10 mailles selon le patron, en faisant attention à ce qu’il y un nombre quasi-égal sur chaque aiguille – eg, pour 12, 3 mailles sur chacun des 4 aiguilles, pour 8, 2 mailles sur chacun des quatre aiguilles, 10 c’est plus difficile mais vous pouvez faire 3 sur 2 aguilles et puis 2 sur les 2 autres…etc.).
-
Puis, commencez à tricoter en ronde sur les 4 aiguilles - faire deux out trois tours utilisant le fil du nombril. Vous êtes en train de faire un sort de « I-cord ». Il est très important de bien serrer votre tricot pour éviter des trous. Si vous ne serrez pas, il se peut qu’il y aura des trous dans le nombril et par conséquent des trous dans votre projet final. Le nombril devait être ferme et pour cela il faut utiliser un fil épais et tricoter serré.
-
Après deux ou trois tours en rond vous allez cessez de tricoter avec le fil du nombril et commencer avec le fil de votre projet. Laissez tombé le fil du nombril et prendre le fil du projet – tricotez deux ou trois ronds (mais ne commencez pas encore à tricoter selon les instructions du patron du projet – faites simplement les ronds en tricot endroit). Pour le premier rond avec le fil du projet assurez-vous que la tension reste serré et tricotez avec le fil du projet jusqu’au le dernier maille du fil du nombril. Il faut que la queue de votre fil du projet soit assez longue (je suggère 60 cm ou 2 feet).
-
Maintenant vous allez enfin pouvoir commencer votre patron !
Pour finir le centre:
Les étapes 8-12 sont à faire à votre convenance
-
Mettre le fil de queue de votre projet dans une aiguille à coudre. En faisant très attention coudez le fil a travers les premiers mailles du fil projet, ce qui sont tricotés dans le dernier rangé du fil épaisse du nombril
-
Avec l’aiguille de couture, tirez la queue lentement et doucement en faisant très attention que les 12 (8, 10, etc ;) mailles sont prise dans le fil. Personnellement, j’utilise une lampe agrandisseur, mais une bonne paire de lunettes peut aussi faire l’affaire. Vous pouvez tirez la queue très serré ou la laissez en « o », comme vous voulez.
(Voici le nombril de mon Lyra, une création légendaire de Herbert Niebling’s)
-
Coudre encore le fil de queue à travers les 12 mailles d’origine, et puis coupez le ou faites ce que vous fassiez d’habitude pour finir vos projets.
-
Avec un paire de ciseaux bien aiguisé, coupé le fil du nombril (le fil épaisse), en faisant très attention à ne pas couper le fil du projet.
-
vous pouvez ensuite jeter le nombril ou le garder précieusement dans votre livret de famille (je plaisante).
Belly Button Start in RUSSIAN! Yes, this is truly an internationally recognized start for circular projects.
Thank you to Linda B. and her affiliation with the Russian knitting forum: http://www.club.osinka.ru/viewtopic.php?t=15294&start=1080
Linda has recently tweaked her translation of the Belly Button Start, and here is the revised version:
“Пуповинное начало”, перевoд
1. Начинать на 2-х прямых спицах.
2. Используя нитки потолще чем для самой салфетки контрастного цвета, набрать необходимое для работы кол-во петель на одну спицу. Очень важно чтобы нитки были контрастного цвета.
3. На прямых спицах провязать вперед-назад кусочек длиной 2,5 см. Важно вязать туго.
4. Расположить петли на 4 спицы.
5. 2-3 ряда провязать лицевыми по кругу туго теми же контрасными нитками. Все время вязать туго. Это "пуповина".
6. Перейти на основные нитки для салфетки и сделать еще 1-2 круга лицевыми. Вязать туго. Предварительно оставить "хвост" из основной нитки дл. 60 см чтобы ее можно было заправить в иголку с ушком.
7. Теперь можно перейти на вязание узора.
Окончание центра. Шаги 8-12 можно cделать в любой момент.
8. Вдеть оставленый "хвост" в ушко острой швейной иглы. Очень осторожно продеть ее в петли первого ряда, связаного основной ниткой.
9. Медленно протянуть нитку через все петли 1-го ряда. Убедиться что нет пропущенных петель. Я пользуюсь лупой с подсветкой.
10. Провести иглу с ниткой еще раз, затянуть, завязать.
11. Очень острыми маленькими ножничками отрезать пуповину из контрастных ниток. Делать это надо с большой осторожностью чтобы не задеть основную нить.
12. Пуповину можно выкинуть, а можно сохранить с датой родов (шутка).
Thanks again, Linda, for providing me with the translation!
______________________________________________________________
Finnish
This translation was provided by Jaana Fogl, who lives in Finland and is a lace-knitting colleague.
Rosemarien Belly Button- eli Napa-aloitus pyöreille neuleille
1. Aloita kahdella suoralla puikolla, jotka ovat samankokoisia kuin puikot, joita aiot käyttää työssä. (Pyöröpuikoille voit vaihtaa normaaliin tapaan, kun työ on siihen riittävän iso.)
2. Käytä paksuhkoa lankaa, mielellään puuvillaa. Paksu, erivärinen akryylilankakin käy, pääasia on, että lanka on paksuhkoa ja napakkaa. Luo YHDELLE puikolle aloitukseen tarvittava silmukkamäärä. On tärkeää, että aloituksessa käytettävä lanka on selkeästi eriväristä kuin itse työssä käytettävä lanka, sillä värierosta on apua siinä vaiheessa, kun aloituspala poistetaan.
Esimerkki: Jos työ on tarkoitus aloittaa 12 silmukalla, jotka jaetaan neljälle puikolle, luot tässä vaiheessa 12 silmukkaa yhdelle suoralle puikolle. 12 silmukkaa on siis vain tässä esimerkissä käytetty aloitussilmukkamäärä, omaa työtäsi aloittaessasi luot puikolle käyttämäsi neuleohjeen edellyttämän määrän silmukoita.
3. Aloita neulomalla edestakaista neuletta noin 2,5 cm. On tärkeää, että neulot mahdollisimman tiiviisti! Aloituspalan on oltava napakka, sillä silloin se tukee useita puikkoja parhaiten.
4. Jaa sitten puikolla olevat silmukat neljälle suoralle puikolle.
5. Jatka samalla langalla ja neulo pari kolme kerrosta suljettua neuletta työn ympäri. Muista vetää lanka tiukalle puikolta toiselle siirtyessä, jotta työhön ei tule aukkoja. Tämä on tärkeää, kun aloitat varsinaisen ohjeen neulomisen. Jos lanka ei ole riittävän tiukalla, aloituspalaan tulee aukkoja, jotka todennäköisesti siirtyvät myös itse työhön. Aloituspalasta tulee mahdollisimman napakka, kun neulot tiukasti riittävän paksulla langalla.
6. Vaihda seuraavaksi lanka. Jatka neulomista varsinaiseen työhön käyttämälläsi langalla, ja neulo kaksi kerrosta suljettua neuletta (älä siis vielä aloita varsinaista neuleohjetta). Yritä neuloa mahdollisimman tiiviisti. Jätä työn aloituslankaan niin pitkä "häntä", että voit myöhemmin helposti pujottaa sen neulaan ja vetää aloitussilmukoiden läpi (noin 60 cm on sopiva pituus).
7. Aloita sitten neulominen valitsemasi ohjeen mukaan.
Aloituksen viimeistely:
Voit siirtyä kohtiin 8 – 12 milloin haluat.
8. Pujota lankaan jättämäsi "häntä" teräväkärkiseen ompeluneulaan. Pujota lanka huolellisesti kaikkien TYÖSSÄ KÄYTTÄMÄLLÄSI LANGALLA neulottujen, ensimmäisen kerroksen silmukoiden läpi.
9. Vedä häntää hitaasti ja varovasti ja varmista, että olet pujottanut langan kaikkien ensimmäisen kerroksen silmukoiden läpi. Valaisevan suurennuslasin käytöstä on apua, mutta hyvä valaistus ja lukulasitkin käyvät. Voit valintasi mukaan vetää "hännän" tiukalle tai jättää aloituskohtaan selvemmin erottuvan aukon.
(Kuvassa on Rosemarien neuloma aloitus Herbert Nieblingin legendaariseen Lyra-malliin).
10. Vedä "häntä" vielä kerran kaikkien aloitussilmukoiden läpi ja päättele se sitten haluamallasi tavalla.
11. Leikkaa lopuksi aloituspala irti pienillä terävillä saksilla. Varo leikkaamasta varsinaiseen työhön käyttämääsi lankaa.
12. Aloituspalan, "navan", voit joko heittää pois tai arkistoida sen muistoksi syntymäpäivästä. :-)
I would like to thank Mara C.
Thanks to Tiziana from Italy for providing this translation!
Il metodo chiamato "The Belly Button" per iniziare lavori in tondo.
Questo metodo vince su quasi ogni altro metodo che io abbia mia visto per avviare le maglie in tondo. Io ne ho provati molti, compreso il "folle" metodo che prevede l'uso di vari ferri a due punte, cuscini, spilli e quant' altro vi venga in mente per appoggiare e tener fermo il lavoro.
Il metodo "Belly Button" rende davvero piacevole l' avvio di qualunque lavoro in tondo.
La fotografia mostra il "Belly Button" usato per il copritavolo "Lyra" , un disegno di Herbert Niebling, che ho fatto nel 2005. Ho adoperato un cotone da uncinetto piuttosto spesso per il "Belly Button", ed un filato molto sottile ( laceweight) in 100% lana colore blu cobalto per il copritavolo.
Ed ora le istruzioni !
Il metodo "Rosemarie's Belly Button" per l'avvio dei lavori in tondo
1. Si comincia usando 2 dei ferri a due punte che verranno impiegati per lavorare il modello scelto. Quando il lavoro sarà sufficientemente largo potrete passare ai ferri circolari.
2. Usando del filato numero 5 o più spesso ( io preferisco il cotone, ma può andare bene anche del filato in acrilico, spesso ed in colore contrastante), avviare su un ferro il numero di maglie indicato nelle istruzioni del modello che volete lavorare. E' importante che il filato sia in un colore contrastante con il filato che userete per il lavoro, perché questo sarà di aiuto quando dovrete rimuovere il "belly button".
Per esempio: se le istruzioni dicono di avviare 12 maglie e dividerle su 4 ferri, dovete semplicemente avviare 12 maglie su un ferro a due punte. Io mi riferirò a 12 maglie nel mio esempio, voi dovrete sostituire quel numero con il numero di maglie indicato nelle vostre istruzioni.
3. Ora... lavorate semplicemente a maglia rasata in ferri di andata e ritorno fino ad avere un pezzo che misura circa 2.5 cm. La tensione del lavoro è importante, per favore, lavorate "stretto". Bisogna che questo pezzo sia molto rigido perché in questo modo sosterrà meglio i ferri a due punte che verranno usati per lavorare in tondo.
4. E poi : dividete le 12 maglie su 4 ferri a due punte ( o sul numero di ferri richiesto dal modello).
5. Lavorate 2 o 3 giri a diritto con il cotone ( o l' acrilico) usato per il "belly button". Essenzialmente, ora state lavorando una famosa "i-cord". Fate attenzione a tirare bene il filo tra un ferro e l' altro per evitare buchi ( o fili allentati).
Questo è un punto importante per l' inizio del modello da lavorare. Se non tirate MOLTO il filo di cotone avrete fili allentati (buchi) fra le maglie del "belly button" e questi, quasi certamente, diventeranno fili allentati (buchi) nel modello che state per cominciare. Il "belly button" deve essere molto rigido, dato che state usando, con ferri sottili, un filato spesso lavorato ad una forte tensione.
6. Abbandonate il filato spesso. Ora, con il filato scelto per il progetto proseguite la lavorazione in tondo facendo 1 o 2 giri a diritto (semplicemente a diritto, senza seguire lo schema !), a tensione forte. Abbiate cura di lasciare all' inizio, un capo di filato lungo circa 60 cm (del filato scelto per il modello) , servirà per chiudere le maglie con l'ago alla fine del lavoro.
7. Ora cominciate a lavorare seguendo lo schema ( o le istruzioni scritte)
Come chiudere il centro :
Potete eseguire questa operazione seguendo le istruzioni nei punti 8- 12 in qualunque fase del lavoro
8. Infilate il capo iniziale del filato sottile in un ago da cucito. Con molta attenzione infilate l' ago nelle maglie del primo giro a diritto (sono le maglie che avete lavorato nell' ultimo giro in cotone (o acrilico) del "belly button".
9. Tirate il capo di filo lentamente e con cura, facendo attenzione ad aver preso tutte le 12 maglie del primo giro fatto con il filato sottile. Io uso una lente d'ingradimento con luce, anche se una buona luce ed un paio d'occhiali serviranno comunque allo scopo.
Potete tirare il cappio con un po' di forza per chiudere il buco centrale o lasciare il foro un po' più aperto ( il lavoro apparirà con una "O" centrale) . La scelta è lasciata al vostro gusto personale.
(Questo è il "belly button" nel mio coprtitavolo Lyra, uno dei leggendari disegni di Hrbert Niebling )
10. Passate l'ago con il capo di filo ancora una volta nelle 12 maglie e quindi fermate il filo o annodatelo secondo il metodo che abitualmente usate.
11. Con un paio di piccolissime, affilatissime forbici, tagliate il "belly button" facendo MOLTA attenzione a non tagliare il filo sottile usato per il lavoro.
12. Ora potete buttar via il "belly button", oppure metterlo nel vostro portfolio con la data e l'ora del "parto" (Scherzo !)
* il termine "belly button" significa ombelico e, l' azione di chiudere il centro del lavoro, all' ideatrice di questo metodo fa venire in mente una nascita.
________________________________________________
 I'm sure that once you've tried this, you'll never go back to another method. This looks much better than the lumpy crochet start, and is much easier to handle than any other method I've used. Not only that, it's FAST, and if you're a cat (kid, dog, etc.) lover and one of the little darlings bumps into you while you're working on your circular start, it won't be total disaster!
If you have kitties in your house, they'll have hours of amusement playing with the belly button, once you remove it. Leave a little "tail" on the belly button, and watch the kitties play!
You are welcome to copy and paste these directions for your own use, or to share with friends. All I ask is that you give me credit!
That's it. Good luck, and if anyone has questions, feel free to ask!
Rosemarie
Labels: belly button knitting, belly button start for circular knitting projects, circular start for knitting
posted by Rosemarie Buchanan @ 9:03 a.m.
![]()
![]()


16 Comments:
At Mon May 15, 09:57:00 a.m. PDT, Michelle said…
Many thanks for these instructions! I'm about to try a doily for my mother and I've been fiddling around with various circular beginnings - can't wait to try this!
At Tue May 16, 05:17:00 a.m. PDT, Anonymous said…
Thank you so much for the instructions!
At Thu May 18, 04:54:00 p.m. PDT, Opal said…
I love your bellybutton start. I just used it for the Frost Flowers and Leaves and it was so easy to do.
Mahalo!
At Fri May 19, 05:48:00 a.m. PDT, Anonymous said…
Coming out of lurkdom to say thanks so much for the wonderful directions.
At Thu Aug 10, 07:10:00 p.m. PDT, Iris in Iowa said…
Rosemary, I hope this is okay: I added a link to your wonderful belly-button instructions to our Rose of England Knit Along http://groups.yahoo.com/group/ROEKAL/. If I've overstepped my bounds or you just prefer it not be listed, please let me know. :-)
Iris
At Sat Aug 12, 09:44:00 p.m. PDT, Rosemarie Buchanan said…
Hi Iris ... you're quite welcome to post a link; all I want is a little credit (and that my name be spelled correctly ... it's Rosemarie Buchanan, not Rosemary!)
I belong to a few yahoo groups and bet I can post a little note in yours, too. I would have emailed you, but I don't have AIM, only ICQ and MSN Messenger, and you didn't post a link to an email addy. Sooo ... hopefully I can find you!
Rosemarie
At Wed Jun 13, 10:02:00 a.m. PDT, Anny said…
Just brilliant!
At Wed Mar 26, 07:39:00 p.m. PDT, Anonymous said…
I realize this was originally posted almost 2 years ago but this is exactly what I needed! I found a great circular pattern and even though I've worked with dpns before, the small number of starting stitches had me stumped. Thank you so much!
At Thu Jun 12, 10:48:00 a.m. PDT, Ada said…
Thank you so much for this tutorial. I'm going to try this for sure.
At Wed Jun 18, 01:05:00 p.m. PDT, ckknitter said…
Thank you! I think I'll try that lace shawl again now! ckk
At Mon Jun 30, 07:15:00 p.m. PDT, Sandy said…
Thanks for your help! :)
At Sun Aug 03, 05:35:00 a.m. PDT, Anonymous said…
Thanks so much for this, just pulled mine out, and it's so nice and neat... saved me a load of crazy! :)
At Fri Aug 28, 04:27:00 p.m. PDT, Jeanine said…
Honestly, this should be out there with the discovery of penicillin as a lifesaver.
HUGE thank you!
Jeanine
At Wed Sep 30, 01:18:00 a.m. PDT, Sanhita said…
Hey, this IS great!! My my what all I have tried and given up every time, now I see the spotlight and the ed of the tunnel!! Thanks a ton for sharing it!! You must be a genie to have come up with this to fulfill the desire of knitting in circles without going into one, for so many!!
At Sun Mar 27, 10:10:00 a.m. PDT, Kit said…
Thank you so much for taking the time to post this beginning to a circular project. I began the Lyra lace project using this start and had great success. My first circular project, first belly button and first dpn project. Thank you again for helping me get started.
At Wed Aug 21, 02:47:00 a.m. PDT, Zillah Bugeja said…
A million thanks. I must have started this pinwheel blanket at least ten times. Of course, the beginning has to be perfect or else it would look awful. Came to you via Techknitter. Just cut the cors and cant believe how perfect it looks. My first real curcular knitting! Thanks again.
Post a Comment
<< Home